DEPRECATED: The legacy builder is deprecated and will be removed in a future release. Install the buildx component to build images with BuildKit: https://docs.docker.com/go/buildx/
Windows/macOS 환경에서도 docker를 사용하기 때문에 비슷하게 동작하지 않을까 한다.
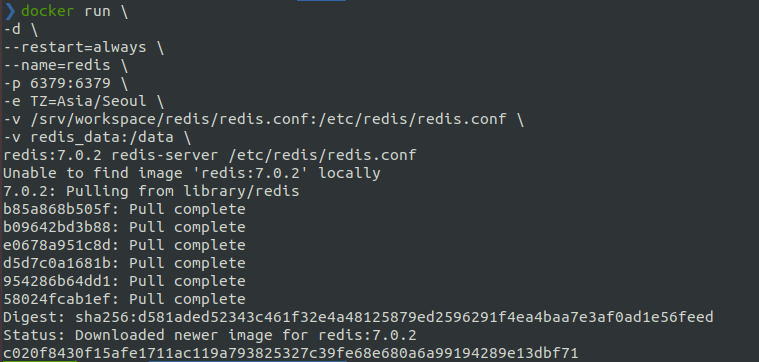
1. Persistent Volume
Redis가 in-memory data-store 솔루션이지만,
안정적 운영을 위해 메모리에 있는 데이터를 디스크에 쓰는 2가지 옵션을 제공한다.
① RDB (Redis Database) : 지정된 시간 간격으로 스냅샷을 파일로 저장
② AOF (Append Only File) : 모든 작업을 기록, 서버가 시작할 때 이 기록을 읽어서 데이터 재구성
어떤 옵션을 사용하더라도 데이터 저장이 되는 곳이 필요하고
보다 수월한 백업 등의 작업을 위해 docker volume 공간을 따로 구성하도록 하겠다.
# 리스트 확인 $ docker volume ls
# 생성 $ docker volume create [name]
# 상세 조회 $ docker volume inspect [name]
volume
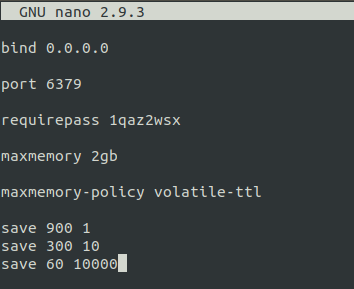
2. Redis Config
접근 가능한 IP를 지정하고, 인증을 위한 패스워드를 넣는 등의 환경 설정을 위한 config 파일을 작성해보자.
또한 config 파일은 host에서 관리할 수 있도록 하겠다.
# 어떤 네트위크 인터페이스로부터 연결할 수 있도록 할 것인지 관리 (여기에서는 Anywhere) bind 0.0.0.0
# 사용 포트 관리 port 6379
# Master 노드의 기본 사용자(default user)의 비밀번호 설정 requirepass [사용하고자 하는 비밀번호]
# Redis 에서 사용할 수 있는 최대 메모리 용량. 지정하지 않으면 시스템 전체 용량 maxmemory 2gb
# maxmemory 에 설정된 용량을 초과했을때 삭제할 데이터 선정 방식 # - noeviction : 쓰기 동작에 대해 error 반환 (Default) # - volatile-lru : expire 가 설정된 key 들중에서 LRU algorithm 에 의해서 선택된 key 제거 # - allkeys-lru : 모든 key 들 중 LRU algorithm에 의해서 선택된 key 제거 # - volatile-random : expire 가 설정된 key 들 중 임의의 key 제거 # - allkeys-random : 모든 key 들 중 임의의 key 제거 # - volatile-ttl : expire time(TTL)이 가장 적게 남은 key 제거 (minor TTL) maxmemory-policy volatile-ttl
# DB 데이터를 주기적으로 파일로 백업하기 위한 설정입니다. # Redis 가 재시작되면 이 백업을 통해 DB 를 복구합니다.
save 900 1 # 15분 안에 최소 1개 이상의 key 가 변경 되었을 때 save 300 10 # 5분 안에 최소 10개 이상의 key 가 변경 되었을 때 save 60 10000 # 60초 안에 최소 10000 개 이상의 key 가 변경 되었을 때
# ~/.bashrc: executed by bash(1) for non-login shells.
# see /usr/share/doc/bash/examples/startup-files (in the package bash-doc)
# for examples

# If not running interactively, don't do anything
case $- in
    *i*) ;;
      *) return;;
esac

# don't put duplicate lines or lines starting with space in the history.
# See bash(1) for more options
HISTCONTROL=ignoreboth

# append to the history file, don't overwrite it
shopt -s histappend

# for setting history length see HISTSIZE and HISTFILESIZE in bash(1)
HISTSIZE=1000
HISTFILESIZE=2000

# check the window size after each command and, if necessary,
# update the values of LINES and COLUMNS.
shopt -s checkwinsize

# If set, the pattern "**" used in a pathname expansion context will
# match all files and zero or more directories and subdirectories.
#shopt -s globstar

# make less more friendly for non-text input files, see lesspipe(1)
[ -x /usr/bin/lesspipe ] && eval "$(SHELL=/bin/sh lesspipe)"

# set variable identifying the chroot you work in (used in the prompt below)
if [ -z "${debian_chroot:-}" ] && [ -r /etc/debian_chroot ]; then
    debian_chroot=$(cat /etc/debian_chroot)
fi

# set a fancy prompt (non-color, unless we know we "want" color)
case "$TERM" in
    xterm-color|*-256color) color_prompt=yes;;
esac

# uncomment for a colored prompt, if the terminal has the capability; turned
# off by default to not distract the user: the focus in a terminal window
# should be on the output of commands, not on the prompt
#force_color_prompt=yes

if [ -n "$force_color_prompt" ]; then
    if [ -x /usr/bin/tput ] && tput setaf 1 >&/dev/null; then
    # We have color support; assume it's compliant with Ecma-48
    # (ISO/IEC-6429). (Lack of such support is extremely rare, and such
    # a case would tend to support setf rather than setaf.)
    color_prompt=yes
    else
    color_prompt=
    fi
fi

if [ "$color_prompt" = yes ]; then
    PS1='${debian_chroot:+($debian_chroot)}\[\033[01;32m\]\u@\h\[\033[00m\]:\[\033[01;34m\]\w\[\033[00m\]\$ '
else
    PS1='${debian_chroot:+($debian_chroot)}\u@\h:\w\$ '
fi
unset color_prompt force_color_prompt

# If this is an xterm set the title to user@host:dir
case "$TERM" in
xterm*|rxvt*)
    PS1="\[\e]0;${debian_chroot:+($debian_chroot)}\u@\h: \w\a\]$PS1"
    ;;
*)
    ;;
esac

# enable color support of ls and also add handy aliases
if [ -x /usr/bin/dircolors ]; then
    test -r ~/.dircolors && eval "$(dircolors -b ~/.dircolors)" || eval "$(dircolors -b)"
    alias ls='ls --color=auto'
    #alias dir='dir --color=auto'
    #alias vdir='vdir --color=auto'

    alias grep='grep --color=auto'
    alias fgrep='fgrep --color=auto'
    alias egrep='egrep --color=auto'
fi

# colored GCC warnings and errors
#export GCC_COLORS='error=01;31:warning=01;35:note=01;36:caret=01;32:locus=01:quote=01'

# some more ls aliases
alias ll='ls -alF'
alias la='ls -A'
alias l='ls -CF'

# Add an "alert" alias for long running commands.  Use like so:
#   sleep 10; alert
alias alert='notify-send --urgency=low -i "$([ $? = 0 ] && echo terminal || echo error)" "$(history|tail -n1|sed -e '\''s/^\s*[0-9]\+\s*//;s/[;&|]\s*alert$//'\'')"'

# Alias definitions.
# You may want to put all your additions into a separate file like
# ~/.bash_aliases, instead of adding them here directly.
# See /usr/share/doc/bash-doc/examples in the bash-doc package.

if [ -f ~/.bash_aliases ]; then
    . ~/.bash_aliases
fi

# enable programmable completion features (you don't need to enable
# this, if it's already enabled in /etc/bash.bashrc and /etc/profile
# sources /etc/bash.bashrc).
if ! shopt -oq posix; then
  if [ -f /usr/share/bash-completion/bash_completion ]; then
    . /usr/share/bash-completion/bash_completion
  elif [ -f /etc/bash_completion ]; then
    . /etc/bash_completion
  fi
fi
. restart-codekube.sh
#!/bin/bash
kubectl get pods "$HOSTNAME" || (
    echo "Use kubens to switch to the namespace of this instance and try again!"
    echo "(we can't do this for you since we don't know the namespace name)"
    exit 1
)
kubectl delete pod "$HOSTNAME"
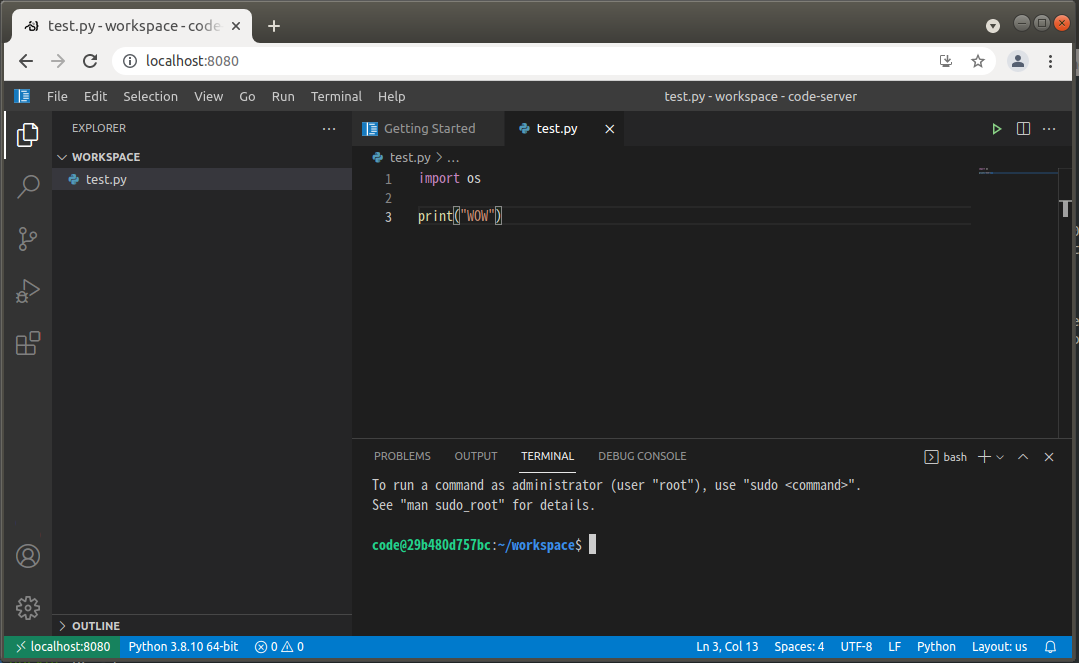
. code.sh
#!/bin/bash
# Script that mimics the open-from-stdin functionality of VSCode
if [ "$1" == "-" ]; then
    TEMP=$(mktemp /tmp/stdin_XXXXXX)
    cat > "$TEMP"
    exec code-server -r "$TEMP"
    exit 0
fi;

# Pass through everything else to `code-server`
# Shellcheck SC2068 = quoting variables to prevent globbing - we want that here.
# shellcheck disable=SC2068
exec code-server $@
. startup.sh
#!/bin/bash
[[ -f /home/code/.homedir-initialized ]] || (
    echo "Remove this file to re-copy files from /etc/skel /opt/default_home at next container startup" > /home/code/.homedir-initialized
    # dotglob to catch files like `.bashrc`
    shopt -s dotglob
    cp -r /etc/skel/* /home/code
    cp -r /opt/default_home/* /home/code
    shopt -u dotglob
    # install kubernetes ext
    #su code --login -c "/usr/bin/code-server --install-extension ms-kubernetes-tools.vscode-kubernetes-tools"
)
# make workspace dir if it doesn't exist
[[ -d /home/code/workspace ]] || mkdir /home/code/workspace
# chown stuff to kube:kube
chown code:code /home/code -R
# generate env whitelist from su using.. a blacklist, pretty much.
env_whitelist=$(env | cut -d = -f 1 | grep -v -e HOSTNAME -e PWD -e HOME -e TERM -e SHLVL -e LC_ALL -e ^_$ | tr "\n" "," | head -c -1)
# configure kubectl so vscode's kubernetes extension works
# su code --login -w "$env_whitelist" -c "/usr/local/bin/generate-kubeconfig.sh"
# start code-server
# su code --login -w "$env_whitelist" -c "/usr/bin/code-server --bind-addr 0.0.0.0:8080 /home/code/workspace" # --enable-proposed-api [\"ms-vsliveshare.vsliveshare\",\"ms-vscode.node-debug\",\"ms-vscode.node-debug2\"]
runuser code --login -w "$env_whitelist" -c "/usr/bin/code-server --bind-addr 0.0.0.0:8080 /home/code/workspace" # --enable-proposed-api [\"ms-vsliveshare.vsliveshare\",\"ms-vscode.node-debug\",\"ms-vscode.node-debug2\"]
2. 설명
① Ubuntu 20.04를 기준으로 했다.
. 18.04도 가능할 것으로 보이지만, `startup.sh` 내용 中 마지막 라인에 있는
. `su` 또는 `runuser`의 `-w` 옵션이 18.04에서는 적용되지 않아서 지금은 20.04로 했다.
→ 18.04에서도 적용 가능하도록 연구해보겠다 (언제가 될지는...^^)
② 개발환경으로 사용되기에 기본적인 패키지들을 설치했다.
. 추후 필요에 따라 추가하면 된다.
. `DEBIAN_FRONTEND="noninteractive"` 부분이 없으면 설치 중간에 사용자 입력을 기다리기도 한다. (설치 오류)