
GitHub-Actions를 어떻게 사용했는지 기억도 잘 떠오르지도 않고
Secret을 어떻게 다뤘는지도 기억이 가물거려서 간단한 예제 겸 교육자료로 써먹고자 진행해봤다.
1. git clone
- 각자 상황에 맞는 Repository를 이용하면 된다.
| ❯ git clone git@github.com:whatwant-school/node-web.git |
2. coding
- 예제를 위해, node.js 웹 서비스를 하나 만들어 보자.
| ❯ nano app.js |
- 그냥, 간단히 어느 host에서 서비스를 하고 있는 것인지를 보여주는 웹페이지이다.
| const http = require('http'); const os = require('os'); console.log(“node-web server starting..."); var handler = function(request, response) { console.log("Received request from " + request.connection.remoteAddress); response.writeHead(200); response.end("You've hit " + os.hostname() + "\n"); }; var www = http.createServer(handler); www.listen(8080); |
3. write Dockerfile
- 위에서 작성한 웹서비스를 구동할 container image를 어떻게 구성할지를 작성해보자.
| ❯ nano Dockerfile |
- 내용은 심플하다.
| FROM node:latest ADD app.js /app.js ENTRYPOINT ["node", "app.js"] |
4. ready DockerHub
- Actions를 이용해 만들어진 container image를 업로드할 DockerHub의 Repository를 준비하자.
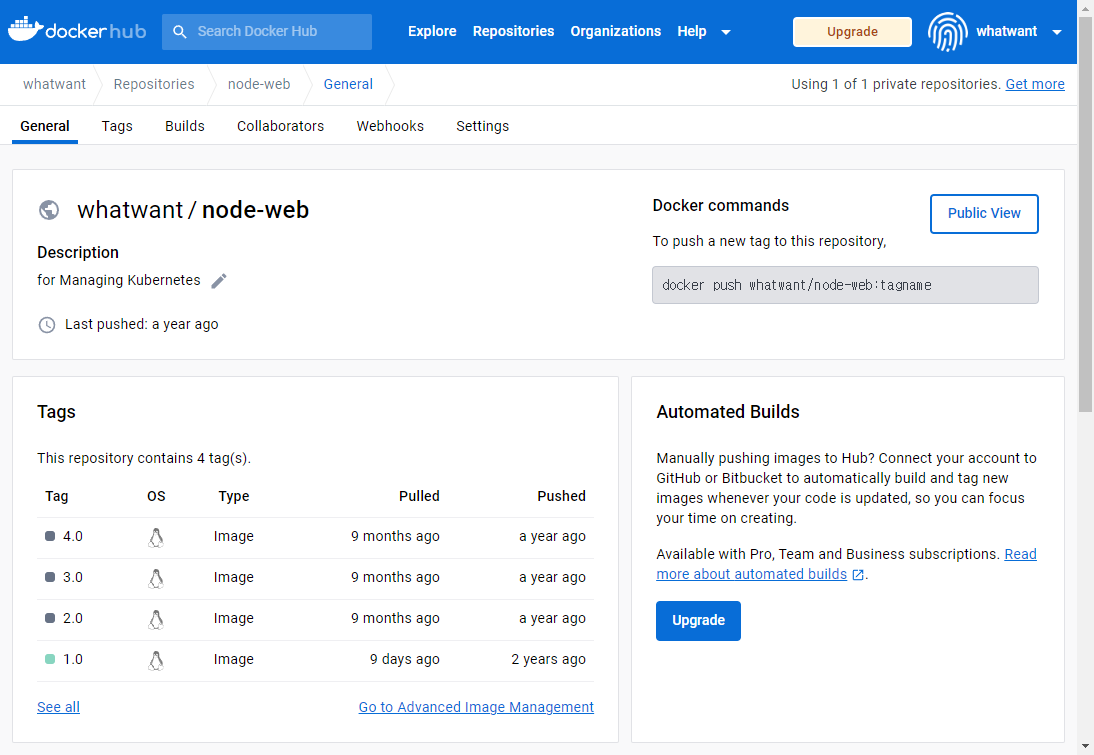
- 이미 1.0 버전이 있지만 해당 버전을 업데이트하는 방식으로 구성할 것이다.
5. get Token
- Actions에서 DockerHub로 업로드 하기 위해서는 계정 인증이 필요하고, 이 때 사용할 Token을 발행해보자.
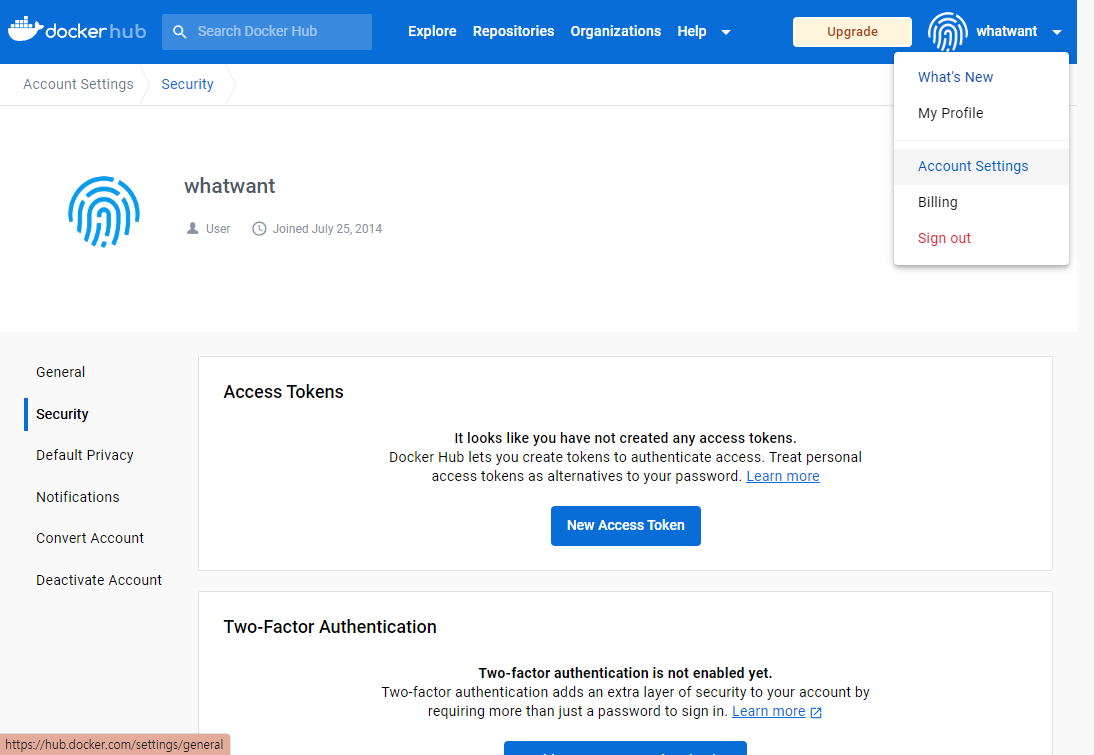
- Write 권한을 필수로 넣어줘야 한다.
6. mkdir
- Repository 내부에 Actions workflow를 작성할 경로를 생성하자.
| ❯ mkdir -p .github/workflows/ |
7. write Action
- 내가 사용할 Action workflow를 작성하자.
| ❯ nano .github/workflows/deploy-image.yml |
- 일부 내용은 각자의 상황에 맞춰서 업데이트 하면 된다.
| name: Build and Push Docker Image on: push: branches: - main jobs: build-and-push-image: runs-on: ubuntu-latest steps: - name: Checkout uses: actions/checkout@v2 - name: Set up Docker Buildx uses: docker/setup-buildx-action@v1 - name: Login to DockerHub uses: docker/login-action@v1 with: username: ${{ secrets.DOCKERHUB_USERNAME }} password: ${{ secrets.DOCKERHUB_TOKEN }} - name: Build and push id: docker_build uses: docker/build-push-action@v2 with: push: true tags: whatwant/node-web:1.0 |
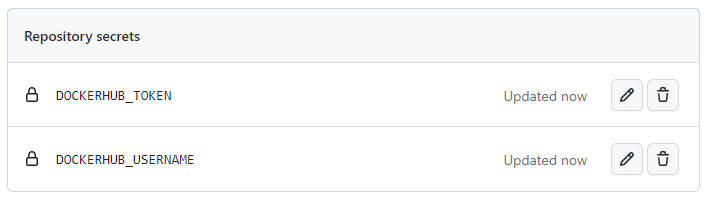
8. Set Secret
- Action workflow에서 사용하는 Secret 변수 값을 입력하자.

- USERNAME과 TOKEN을 입력하면 된다.
9. push
- 이제 준비는 끝났다. push 해보자.
| ❯ git add -A ❯ git commit -m "make action's workflow" ❯ git push origin main |
10. Actions
- 입력한대로 잘 동작했는지 확인해보자.
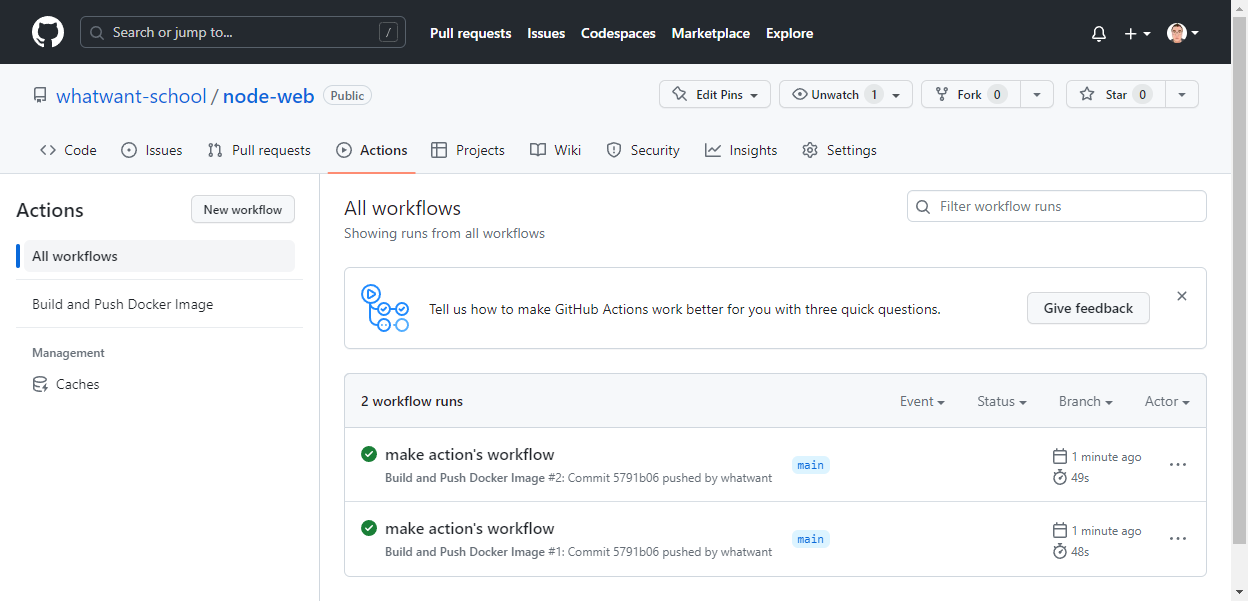
- 상세 내용도 확인해볼 수 있다.

- 로그 레벨로도 확인해볼 수 있다.

- 정말 DockerHub에 업로드까지 잘 되었는지 확인해보자.

여기까지~
'SCM > Git-GitHub' 카테고리의 다른 글
| Copilot Chat's Rules 유출(?) (0) | 2023.06.04 |
|---|---|
| GitHub Copilot X - Chat (0) | 2023.06.04 |
| Meta의 Git 지원 버전관리 도구 Sapling 공개 (0) | 2022.11.25 |
| git 실수해도 괜찮아요 (0) | 2022.07.02 |
| GitHub에서 수식 입력 하기 (with LaTex) (0) | 2022.06.07 |