▶ VirtualBox
오픈소스 프로젝트를 너무나 애정하는 입장에서 오랫동안 VM 도구는 VirtualBox를 애용하고 있던 중,
VirtualBox가 2008년도에 `썬 마이크로시스템즈(Sun Microsystems)`에 인수되어 살짝 불안감이 생겼었고
2010년도에는 `오라클(Oracle)`에서 `썬 마이크로시스템즈`를 인수하면서 불안감이 증폭되었었다.
VirtualBox는 현재 기본 패키지는 GPLv2 라이선스로 배포를 하고 있지만
역시나 오라클은 `Extension Pack`에 대해서 PUEL 라이선스를 적용해버렸다.
개인 사용 및 교육용으로는 무료로 사용 가능하지만, 회사에서는 사용할 수 없는 것이다.
- https://www.virtualbox.org/wiki/VirtualBox_PUEL

VirtualBox 기본 플랫폼만으로도 어느 정도 사용 가능하지만,
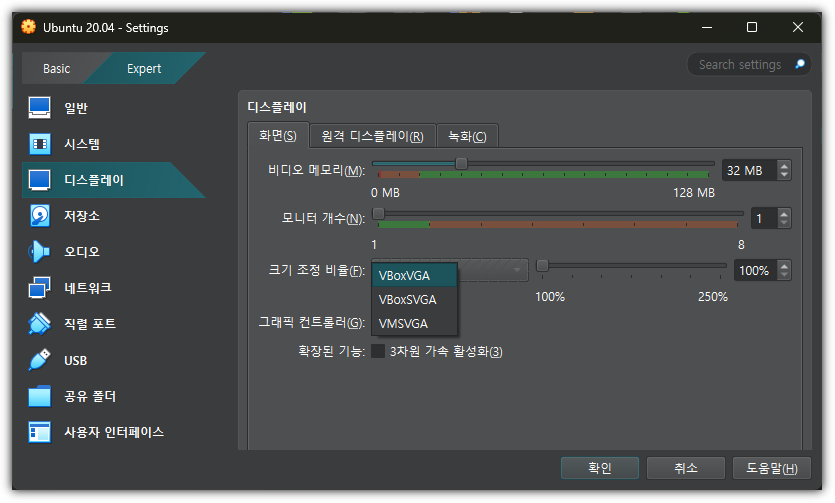
`Extension Pack`을 설치해야 화면해상도, 공유폴더, USB3.0 지원 및 원격접속 등 많은 기능이 추가된다.
집에서 `Extension Pack(Guest Additions)`을 설치한 상태에서 사용하다가
회사에서 기본 패키지만 가지고 VirtualBox를 사용하면 정말 정말 불편하다.
▶ VMware Workstation
VMware가 2023년에 Broadcom에 인수되면서 Enterprise 라이선스 정책을 변경하면서
많은 회사에서 VMware를 걷어내고 OpenStack과 같은 솔루션으로 갈아타고자 노력하고 있다.
당연히 금액적으로 엄청난 인상을 한 것과 같은 희한한(나쁜!) 라이선스 정책을 도입했기 때문이다.
그런데, 의외로 개인 PC용 제품인 Fusion, Workstation을 무료로 배포를 해버렸다 !!!
- https://blogs.vmware.com/cloud-foundation/2024/11/11/vmware-fusion-and-workstation-are-now-free-for-all-users/

의외로 이를 모르는 사람들이 꽤 많다는 것이 신기하다.
container 세상이 되어버려서 VM 인기가 확 식어버려서인가?!
집과 회사에서 같은 VM 솔루션을 이용하기 위해 이제는 VirtualBox를 버리고
VMware Workstation으로 갈아타보려한다.
▶ VMware Workstation Pro
VMware 홈페이지를 방문하면 솔루션 정보를 찾는 것이나 다운로드 받는 것, 심지어 회원 가입하는 것도 쉽지 않다.
Broadcom 특성이려나!? (그렇다. 나는 Broadcom에 반감이 있다. ESXi 라이선스 정책 변경으로 개고생을 ㅠㅠ)
처음 방문하는 분은 아래 경로 찾는 것도 쉽지 않을 것이다.
- https://www.vmware.com/products/desktop-hypervisor/workstation-and-fusion

무료로 다운로드 받을 수 있다고 했지만, 회원 가입이 필요 없다고는 하지 않았다!
그렇다. 다운로드 받으려면 로그인(회원가입)이 필요하다.
- https://profile.broadcom.com/web/registration

회원가입 및 로그인 후에 Free Downloads 페이지에서 `workstation`을 검색해야 한다.
- https://support.broadcom.com/group/ecx/free-downloads

Free 배포를 하게 되면서 더이상 개발을 하지 않을까 살짝 의심했지만,
그래도 26H1 버전까지 꾸준히 업데이트는 해주고 있다.

원하는 버전 선택 후 다운로드 받으면 된다.

설치 과정은 그냥 다운로드 받은 파일을 실행하면 된다. 설명까지 필요한 내용은 없다.

응!? 설치관련 포스팅인데 정작 설치에 대한 내용은 별게 없네!? ^^
'Dev Tools > VirtualBox&VMware' 카테고리의 다른 글
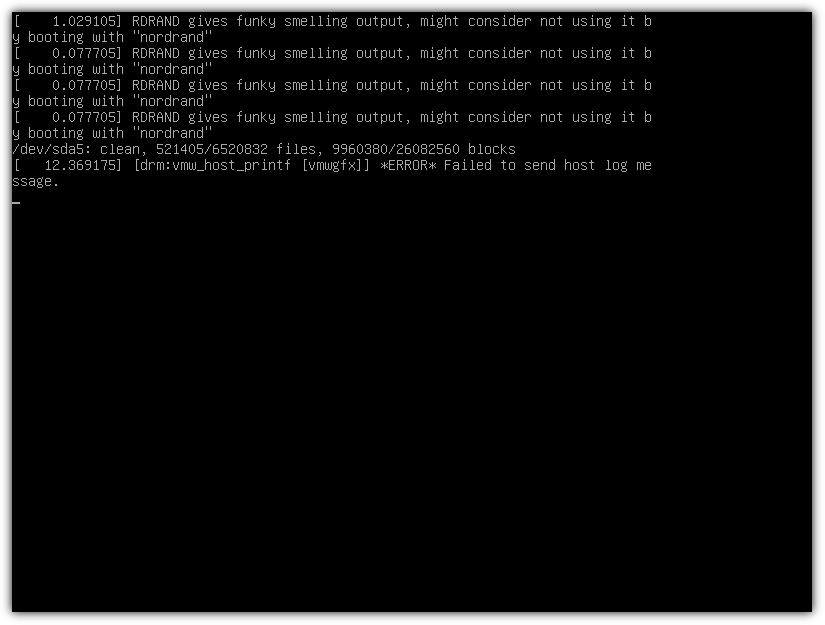
| VirtualBox Error 'drm:vmw_host_printf [vmwgfx]] *ERROR* Failed to send host log message' (0) | 2024.12.07 |
|---|---|
| VirtualBox 머신 복제 (0) | 2023.04.15 |
| Vagrant 여러 개의 VM 생성하기 (0) | 2021.07.26 |
| Vagrant 사용하기 - 기본 (0) | 2021.07.14 |
| Vagrant 이미지 업로드 (VirtualBox) (0) | 2021.07.14 |