AI를 이용한 코딩을 한다고 할 때, 제일 먼저 떠오르는 것은 GitHub의 Copilot이다.
개인적으로도 정말 애정하는 것이 바로 Copilot이다.
그러던 중, 요즘 많은 관심을 받고 있다는 'GPT Pilot'이라는 것을 알게 되었다.
응?! ChatGPT + Copilot ????
- https://github.com/Pythagora-io/gpt-pilot

타이틀만 보면 왠지 짝퉁 느낌이 많이 들지만, 사람들의 엄청난 관심을 받은 것을 보면 사짜는 아닌 것 같다 ^^
Star 숫자를 보면 거의 1만5천 ... 부럽다.

정체를 설명한 글을 살펴보면
무려 개발 속도를 20배나 빠르게 해준단다!!!

그런데, 설명을 보면 Copilot의 아류작이 아니라 Auto-GPT의 아류작인 것으로 보인다.
Copilot처럼 IDE Extension 방식으로 인터페이스 하는 것이 아니라 CLI 환경에서의 티키타카 방식이다.
그러면 이 프로젝트는 왜 만들어진 것일까? 목적이 무엇일까? 그리고 한계점을 무엇일까?
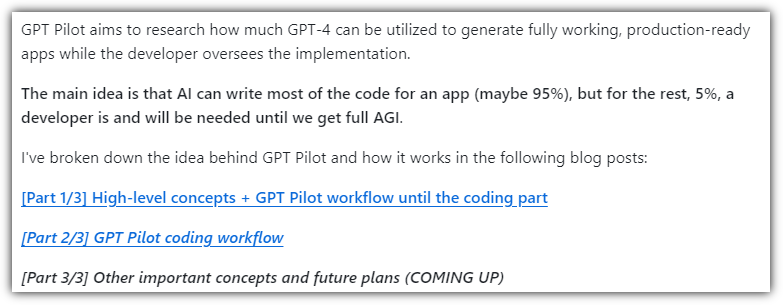
GPT-4를 이용해서 개발자가 실무에서 얼마나 도움을 받을 수 있는지를 확인하고자 하는 목적이며,
결국 5% 정도는 개발자가 관여를 해야한다는 점을 밝히고 있다.
지금까지 배경에 대해서는 충분히 알아봤으니 일단 한 번 부딪혀보자 !!!
▶ Requirements
- Python 3.9-3.12
- PostgreSQL (선택 사항, 기본값은 SQLite)
티키타카를 하면서 진행을 하기 위해서는 진행되고 있는 내용을 기억해야할 저장소가 필요하기에 DB가 필수라고 한다.
① Python
- 원하는 버전의 Python을 편하게 사용하려면 pyenv를 활용하는 것을 추천한다.
. https://www.whatwant.com/entry/pyenv
| ❯ pyenv versions system * 3.8.16 (set by /home/chani22/.pyenv/version) ❯ pyenv install --list | grep 3.9. ... 3.9.15 3.9.16 ... ❯ pyenv install 3.9.16 Downloading Python-3.9.16.tar.xz... -> https://www.python.org/ftp/python/3.9.16/Python-3.9.16.tar.xz Installing Python-3.9.16... ❯ pyenv global 3.9.16 ❯ python --version Python 3.9.16 |
② PostgreSQL
- 음... 기본값으로 SQLite를 사용하게 되어있으므로, 일단 빠른 진행을 위해 지금은 생략 ^^ (절대 귀찮아서가 아닙... ^^)
▶ install / clone
GPT Pilot 사용하기 위해 clone 및 설정을 진행해보자.
① clone
| ❯ git clone https://github.com/Pythagora-io/gpt-pilot.git 'gpt-pilot'에 복제합니다... ❯ cd gpt-pilot |
② 필요 패키지 설치
| ❯ python -m venv pilot-env ❯ source pilot-env/bin/activate ❯ pip install -r requirements.txt |
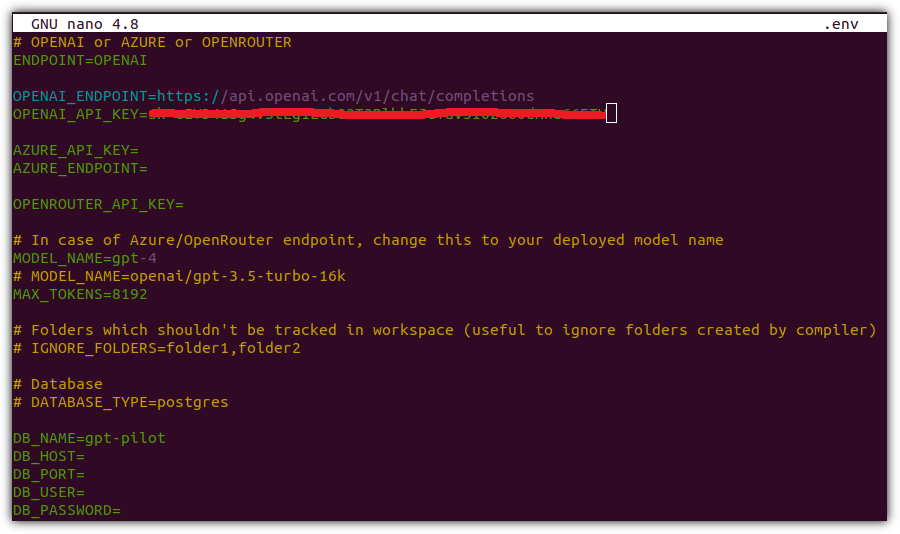
③ 환경 파일 생성
| ❯ cd pilot ❯ mv .env.example .env |
▶ Key 등록
OPENAI가 아닌 AZURE, OPENROUTER도 사용할 수 있다는데, 우린 그냥 OPENAI를 사용하는 것으로 하자.
- https://platform.openai.com/api-keys

새로 secret key를 생성해보자.

생성된 key 복사 잘 해서 입력하고, 저장하자.
▶ DB Init
사실 지금은 별게 없는데, 나중에 PostgreSQL을 사용하게 되면 보충해야할 영역인 것 같다.
| ❯ python db_init.py |
▶ Start (#1)
일단 시작해보자.

GPT 4 API를 사용할 수 없단다!
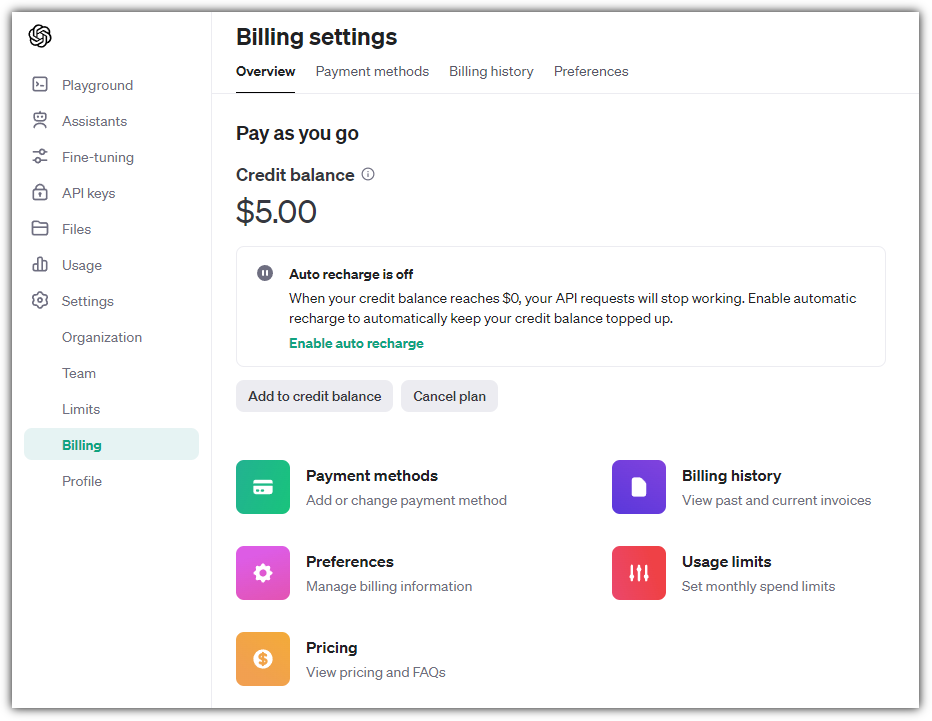
어!? 나는 유료 사용자인데?!
세금 포함해서 무려 22$를 지불하고 있는데, 이게 뭔 헛소리야!?
▶ GPT4 API
그동안 채팅만 했지 API를 사용하지를 않았더니.... 이런 무식한 상황이 ^^
결재 정보를 등록해야 GPT4 API를 사용할 수 있다.
- https://platform.openai.com/account/billing/payment-methods

Payment 정보를 등록하자.

"Add payment details"를 클릭하면 된다.

최소 5$ 결제를 해야 한다.
치사한 XX

통장에 돈을 넣어놔야 뭔가 사용권을 주는 그런 느낌...
사용할 수 있는 API들은 다음과 같이 확인할 수 있다.
- https://platform.openai.com/account/limits

▶ Start (#2)
아까 에러난 상황에서 위와 같이 GPT4 API를 사용할 수 있게 해놓고
이어서 시작하려고 하면 ... 그래도 안된다.
시간이 좀 지나면 되는 걸 수도 있지만 잘 안되어서 사용하던 터미널 종료 하고
secret key 재발급 받고, .env 파일에 다시 입력한 뒤에 다음과 같이 다시 진입하였다.
| ❯ cd /path/gpt-pilot # gpt-pilot 루트 경로 ❯ source pilot-env/bin/activate ❯ cd pilot ❯ python main.py |
만들어보고자 하는 사례는 "GitHub 관련 뉴스를 수집해서 보여주는 웹페이지"로 해봤다.
| ❯ python main.py ------------------ STARTING NEW PROJECT ---------------------- If you wish to continue with this project in future run: python main.py app_id=448522d6-d6d2-4fe3-be2b-33c731dac5eb -------------------------------------------------------------- ? What is the project name? GitHub_News ? Describe your app in as much detail as possible. Develop a webpage that aggregates and displays news about GitHub. ? Which platforms do you want to support with this application: web, mobile or both? web ? Does the content need to be updated in real-time? Or is a daily/weekly update sufficient? daily ? Do you have specific sources in mind that the application should scrape for GitHub news or should it search widely across the internet? no ? Do you want to include a user login system or should the webpage be publicly accessible to anyone without login? no {"technologies": ["Node.js", "MongoDB", "Mongoose", "Bootstrap", "Javascript", "cronjob", "Socket.io"]} ? Please set up your local environment so that the technologies listed can be utilized. When you're done, write "DONE" |
물어보는 것에 대답을 해주면 된다.
그런데 ...
| ... 🚀 Now for the actual development... Implementing task #1: Setup Node.js server To complete task one, let's outline the steps necessary. We need to: 1. Initialize NPM and download the necessary packages. 2. Build a basic Express app and put it in server.js. **Step 1: Initialize NPM and download necessary packages.** To initialize NPM in your current directory and fetch necessary libraries, run the following commands in your terminal: ``` npm init -y npm install express ``` ... --------- EXECUTE COMMAND ---------- Can I execute the command: `node --version` with 2000ms timeout? ? If yes, just press ENTER |
잘 진행하다가 갑자기 node 관련해서 에러가 발생했는데...
뭔가 무한루프에 빠진 느낌으로 계속 node 관련해서 벗어나지를 못하는 것이다!
▶ node
GPT Pilot은 기본적으로 node를 아주 선호한다.
그런데, node를 설치까지는 해주지 못하는 것으로 보인다.
그러면, 직접 설치를 해줘야지.... ㅠㅠ
pyenv처럼 여러 버전의 node를 관리할 수 있는 nvm을 이용해서 node를 설치하자.
- https://www.whatwant.com/entry/npm
그리고 지금 사용하고 있는 터미널을 종료하고,
다시 GPT Pilot을 시작하자.
| ❯ cd /path/gpt-pilot # gpt-pilot 루트 경로 ❯ source pilot-env/bin/activate ❯ cd pilot ❯ python main.py |
▶ Start (#3)
같은 설명을 줘도 뒤에 따라오는 질문들은 바뀐다.
그것에 따라 진행하는 소스코드 내용도 바뀐다.
즉, 할 때 마다 다른 결과물이 나올 수 있다는 말이다.
| ❯ python db_init.py ------------------ STARTING NEW PROJECT ---------------------- If you wish to continue with this project in future run: python main.py app_id=c06e0511-9f0f-4b1f-9c49-1347fc82d116 -------------------------------------------------------------- ? What is the project name? GitHub_News ? Describe your app in as much detail as possible. Develop a webpage that aggregates news about GitHub. ? Should the news aggregation be real-time or periodically updated? daily ? Should the aggregated news be categorized based on specific topics or tags associated with GitHub? no ? Do you have any specific sources in mind from where the news about GitHub should be aggregated? no ? Is there a limit to the number of news items to be displayed or stored at any given time? 15 ? Would you like the app to have an archive feature where older news can be accessed? no Project Summary: The "GitHub_News" app will be a webpage designed to aggregate news about GitHub. The content on this webpage will be updated daily without categorizing into specific topics or tags. There are no prescribed sources from where the news about GitHub should be aggregated. The number of news items displayed or stored at any given time will be limited to 15. There will be no archive feature, hence older news items won't be accessible. {"technologies": ["Node.js", "MongoDB", "Mongoose", "Jest", "Bootstrap", "Vanilla JavaScript", "cronjob"]} ? Please set up your local environment so that the technologies listed can be utilized. When you're done, write "DONE" |
"DONE"을 하고 나면 스스로 뭔가 코딩을 시작한다.
필요한 패키지들 설치도 하고 DB도 생성하고....
| ... Dev step 1 First, you need to initialize npm for your new Node.js project. Run the following command: ```bash npm init -y ``` This will create a file 'package.json' in your project directory and will be used to store metadata about your app and also track the dependencies of your app such as Express, Mongoose, etc. Next, you'll require several Node.js packages to develop the app, and for the current task, you need to install Express, Mongoose, and node-cron. Run the following command to install these dependencies: ``` npm install express mongoose node-cron ``` Next, you also need to set up your main application file. Let's call it 'app.js'. /app.js ```javascript const express = require('express'); const mongoose = require('mongoose'); const cron = require('node-cron'); const app = express(); //Express body parser middleware app.use(express.json()); app.use(express.urlencoded({ extended: false })); app.get('/', (req, res) => { res.send('Hello World!'); }); // Define your port const PORT = process.env.PORT || 3000; // Starting the server app.listen(PORT, () => { console.log(`App running on port ${PORT}`); }); ``` To test the set up, run the server with the command: ``` node app.js ``` Dev step 2 {"tasks": [{"type": "command", "command": {"command": "npm init -y", "timeout": 2500, "success_message": "created a new package.json file"}}, {"type": "command", "command": {"command": "npm install express mongoose node-cron", "timeout": 10000, "success_message": "added packages"}}, {"type": "code_change", "code_change": {"name": "app.js", "path": "app.js", "content": "const express = require('express');\nconst mongoose = require('mongoose');\nconst cron = require('node-cron');\n\nconst app = express();\n\n//Express body parser middleware\napp.use(express.json());\napp.use(express.urlencoded({ extended: false }));\n\napp.get('/', (req, res) => {\n res.send('Hello World!');\n});\n\n// Define your port\nconst PORT = process.env.PORT || 3000;\n\n// Starting the server\napp.listen(PORT, () => {\n console.log(`App running on port ${PORT}`);\n});"}}, {"type": "command", "command": {"command": "node app.js", "timeout": 5000, "success_message": "App running on port 3000", "command_id": "run_server"}}]} --------- EXECUTE COMMAND ---------- Can I execute the command: `npm init -y` with 2500ms timeout? ? If yes, just press ENTER answer: CLI OUTPUT:Wrote to /srv/workspace/gpt-pilot/workspace/GitHub_News/package.json: CLI OUTPUT:{ CLI OUTPUT: "name": "github_news", CLI OUTPUT: "version": "1.0.0", CLI OUTPUT: "description": "", CLI OUTPUT: "main": "index.js", CLI OUTPUT: "directories": { CLI OUTPUT: "test": "tests" CLI OUTPUT: }, CLI OUTPUT: "scripts": { CLI OUTPUT: "test": "echo \"Error: no test specified\" && exit 1" CLI OUTPUT: "keywords": [], CLI OUTPUT: "author": "", CLI OUTPUT: "license": "ISC" Saving file /package.json Dev step 3 DONE --------- EXECUTE COMMAND ---------- Can I execute the command: `npm install express mongoose node-cron` with 10000ms timeout? ? If yes, just press ENTER answer: Saving file /package.json Saving file /package.json Dev step 5 {"thoughts": "From developer's description, they say the 'npm install' command took longer than 10,000 milliseconds to execute and was therefore terminated. This could be due to slow network speeds or the npm registry taking a longer time to respond. It could be a transient issue that could be resolved by trying again. Or it could be a more persistent issue related to firewall restrictions or other network related issues.", "reasoning": "First, we want to confirm that we have network connection, then we can try testing the npm service by attempting to install a small, commonly used package (like 'lodash') to see if it also hangs. If the 'lodash' package installation succeeds without hanging, we can then try re-running the initial command as it may have been a transient npm registry issue.", "steps": [{"type": "command", "command": {"command": "ping -c 5 npmjs.com", "timeout": 5000, "success_message": "5 packets transmitted, 5 received"}, "check_if_fixed": false}, {"type": "command", "command": {"command": "npm install lodash", "timeout": 10000, "success_message": "+ lodash"}, "check_if_fixed": false}, {"type": "command", "command": {"command": "npm install express mongoose node-cron", "timeout": 30000, "success_message": "+ express\n + mongoose\n + node-cron"}, "check_if_fixed": true}]} --------- EXECUTE COMMAND ---------- Can I execute the command: `ping -c 5 npmjs.com` with 5000ms timeout? ? If yes, just press ENTER answer: CLI OUTPUT:PING npmjs.com (104.19.154.92) 56(84) bytes of data. CLI OUTPUT:64 바이트 (104.19.154.92 (104.19.154.92)에서): icmp_seq=1 ttl=51 시간=3.70 ms CLI OUTPUT:64 바이트 (104.19.154.92 (104.19.154.92)에서): icmp_seq=2 ttl=51 시간=6.01 ms CLI OUTPUT:64 바이트 (104.19.154.92 (104.19.154.92)에서): icmp_seq=3 ttl=51 시간=3.63 ms CLI OUTPUT:64 바이트 (104.19.154.92 (104.19.154.92)에서): icmp_seq=4 ttl=51 시간=3.58 ms CLI OUTPUT:64 바이트 (104.19.154.92 (104.19.154.92)에서): icmp_seq=5 ttl=51 시간=5.32 ms CLI OUTPUT:--- npmjs.com 핑 통계 --- CLI OUTPUT:5 패킷이 전송되었습니다, 5 수신되었습니다, 0% 패킷 손실, 시간 4005ms Saving file /package.json Dev step 6 DONE --------- EXECUTE COMMAND ---------- Can I execute the command: `npm install lodash` with 10000ms timeout? ? If yes, just press ENTER answer: CLI OUTPUT: CLI OUTPUT:added 1 package, and audited 2 packages in 573ms Saving file /package.json Dev step 7 DONE --------- EXECUTE COMMAND ---------- Can I execute the command: `npm install express mongoose node-cron` with 30000ms timeout? ? If yes, just press ENTER answer: CLI OUTPUT: CLI OUTPUT:added 86 packages, and audited 88 packages in 3s CLI OUTPUT:12 packages are looking for funding CLI OUTPUT: run `npm fund` for details Saving file /package.json Dev step 8 DONE Saving file /package.json Dev step 9 NO Saving file /package.json Saving file /app.js Can you check if the app works please? Here is a description of what should be working: Testing this task doesn't involve any API requests or writing any code. Instead, we will check whether the server is running properly and dependencies are installed correctly via npm. To do this, a human user should perform the following steps: 1. In the terminal, navigate to the project directory using the command `cd /path-to-your-project-directory`. 2. To test if the server runs without any issues, type the following command in your terminal: ```bash node app.js ``` You should see a response saying 'App running on port 3000'. This verifies that the server is running properly with the specified dependencies. 3. Press `Ctrl + C` to stop the server. 4. Next, verify that the dependencies are installed correctly. Open the 'package.json' file and under 'dependencies', it should list the following: ```json "dependencies": { "express": "version-number", "mongoose": "version-number", "node-cron": "version-number" } ``` The 'version-number' should represent the installed version of each package. If the server runs correctly and the 'package.json' file lists the correct dependencies, the task has been successfully completed. If you want to run the app, just type "r" and press ENTER and that will run `node app.js` ? If something is wrong, tell me or type "continue" to continue. Can you check if the app works please? Here is a description of what should be working: Testing this task doesn't involve any API requests or writing any code. Instead, we will check whether the server is running properly and dependencies are installed correctly via npm. To do this, a human user should perform the following steps: 1. In the terminal, navigate to the project directory using the command `cd /path-to-your-project-directory`. 2. To test if the server runs without any issues, type the following command in your terminal: ```bash node app.js ``` You should see a response saying 'App running on port 3000'. This verifies that the server is running properly with the specified dependencies. 3. Press `Ctrl + C` to stop the server. 4. Next, verify that the dependencies are installed correctly. Open the 'package.json' file and under 'dependencies', it should list the following: ```json "dependencies": { "express": "version-number", "mongoose": "version-number", "node-cron": "version-number" } ``` The 'version-number' should represent the installed version of each package. If the server runs correctly and the 'package.json' file lists the correct dependencies, the task has been successfully completed. If you want to run the app, just type "r" and press ENTER and that will run `node app.js` ? If something is wrong, tell me or type "continue" to continue. r CLI OUTPUT:App running on port 3000 ^C CTRL+C detected. Stopping command execution... Can you check if the app works please? Here is a description of what should be working: Testing this task doesn't involve any API requests or writing any code. Instead, we will check whether the server is running properly and dependencies are installed correctly via npm. To do this, a human user should perform the following steps: 1. In the terminal, navigate to the project directory using the command `cd /path-to-your-project-directory`. 2. To test if the server runs without any issues, type the following command in your terminal: ```bash node app.js ``` You should see a response saying 'App running on port 3000'. This verifies that the server is running properly with the specified dependencies. 3. Press `Ctrl + C` to stop the server. 4. Next, verify that the dependencies are installed correctly. Open the 'package.json' file and under 'dependencies', it should list the following: ```json "dependencies": { "express": "version-number", "mongoose": "version-number", "node-cron": "version-number" } ``` The 'version-number' should represent the installed version of each package. If the server runs correctly and the 'package.json' file lists the correct dependencies, the task has been successfully completed. If you want to run the app, just type "r" and press ENTER and that will run `node app.js` ? If something is wrong, tell me or type "continue" to continue. r CLI OUTPUT:App running on port 3000 ^C CTRL+C detected. Stopping command execution... ? If something is wrong, tell me or type "continue" to continue. continue Implementing task #2: Set up MongoDB and create a Mongoose schema for storing the GitHub news To complete the task "Set up MongoDB and create a Mongoose schema for storing the GitHub news", we need to make some changes to the existing file and create new ones. Here is the required code. **/config/db.js** ``` const mongoose = require('mongoose'); // Replace this with your MONGOURI. const MONGOURI = "mongodb://localhost:27017/github_news_db"; const InitiateMongoServer = async () => { try { await mongoose.connect(MONGOURI, { useNewUrlParser: true, useUnifiedTopology: true }); console.log("Connected to the Database :: MongoDB"); } catch (e) { console.log(e); throw e; } }; module.exports = InitiateMongoServer; ``` The MONGOURI should be replaced with the actual address where MongoDB is running. Next, a schema for the news needs to be created. **/models/News.js** ``` const mongoose = require('mongoose'); const NewsSchema = mongoose.Schema({ title: String, Saving file /package.json Saving file /app.js Dev step 12 To complete the task "Set up MongoDB and create a Mongoose schema for storing the GitHub news", we need to make some changes to the existing file and create new ones. Here is the required code. **/config/db.js** ``` const mongoose = require('mongoose'); // Replace this with your MONGOURI. const MONGOURI = "mongodb://localhost:27017/github_news_db"; const InitiateMongoServer = async () => { try { await mongoose.connect(MONGOURI, { useNewUrlParser: true, useUnifiedTopology: true }); console.log("Connected to the Database :: MongoDB"); } catch (e) { console.log(e); throw e; } }; module.exports = InitiateMongoServer; ``` The MONGOURI should be replaced with the actual address where MongoDB is running. Next, a schema for the news needs to be created. **/models/News.js** ``` const mongoose = require('mongoose'); const NewsSchema = mongoose.Schema({ title: String, description: String, url: String, date: Date }); module.exports = mongoose.model('News', NewsSchema); ``` Finally, we should call the function to connect to the database at the start of our application. **/app.js** ``` const express = require('express'); const cron = require('node-cron'); const InitiateMongoServer = require('./config/db'); const app = express(); app.use(express.json()); app.use(express.urlencoded({ extended: false })); InitiateMongoServer(); app.get('/', (req, res) => { res.send('Hello World!'); }); const PORT = process.env.PORT || 3000; app.listen(PORT, () => { console.log(`App running on port ${PORT}`); }); ``` In the above code we required the db.js file and initiated the Mongo server using the function "InitiateMongoServer". dB.js file handles the connection to MongoDB. To test this task, you can just run the server and if server logs "Connected to the Database :: MongoDB" message, that means MongoDB is connected successfully. If there are any errors in connection, it will also be logged to console. Use the following command to start the server: ```bash node app.js ``` Saving file /package.json Saving file /app.js Dev step 13 {"tasks": [{"type": "code_change", "code_change": {"name": "db.js", "path": "/config/db.js", "content": "const mongoose = require('mongoose');\n\nconst MONGOURI = \"mongodb://localhost:27017/github_news_db\";\n\nconst InitiateMongoServer = async () => {\n try {\n await mongoose.connect(MONGOURI, {\n useNewUrlParser: true,\n useUnifiedTopology: true\n });\n console.log(\"Connected to the Database :: MongoDB\");\n } catch (e) {\n console.log(e);\n throw e;\n }\n};\n\nmodule.exports = InitiateMongoServer;"}}, {"type": "code_change", "code_change": {"name": "News.js", "path": "/models/News.js", "content": "const mongoose = require('mongoose');\n\nconst NewsSchema = mongoose.Schema({\n title: String,\n description: String,\n url: String,\n date: Date\n});\n\nmodule.exports = mongoose.model('News', NewsSchema);"}}, {"type": "code_change", "code_change": {"name": "app.js", "path": "/app.js", "content": "const express = require('express');\nconst cron = require('node-cron');\nconst InitiateMongoServer = require('./config/db');\n\nconst app = express();\napp.use(express.json());\napp.use(express.urlencoded({ extended: false }));\n\nInitiateMongoServer();\n\napp.get('/', (req, res) => {\n res.send('Hello World!');\n});\n\nconst PORT = process.env.PORT || 3000;\n\napp.listen(PORT, () => {\n console.log(`App running on port ${PORT}`);\n});"}}, {"type": "command", "command": {"command": "node app.js", "timeout": 10000, "success_message": "Connected to the Database :: MongoDB"}}]} Updated file /srv/workspace/gpt-pilot/workspace/GitHub_News/config/db.js Updated file /srv/workspace/gpt-pilot/workspace/GitHub_News/models/News.js Updated file /srv/workspace/gpt-pilot/workspace/GitHub_News/app.js --------- EXECUTE COMMAND ---------- Can I execute the command: `node app.js` with 10000ms timeout? ? If yes, just press ENTER answer: CLI OUTPUT:App running on port 3000 CLI ERROR:(node:26226) [MONGODB DRIVER] Warning: useNewUrlParser is a deprecated option: useNewUrlParser has no effect since Node.js Driver version 4.0.0 and will be removed in the next major version CLI ERROR:(Use `node --trace-warnings ...` to show where the warning was created) CLI ERROR:(node:26226) [MONGODB DRIVER] Warning: useUnifiedTopology is a deprecated option: useUnifiedTopology has no effect since Node.js Driver version 4.0.0 and will be removed in the next major version Saving file /package.json Saving file /app.js Saving file /config/db.js Saving file /models/News.js Dev step 14 NEEDS_DEBUGGING Got incorrect CLI response: stderr: ``` (node:26226) [MONGODB DRIVER] Warning: useNewUrlParser is a deprecated option: useNewUrlParser has no effect since Node.js Driver version 4.0.0 and will be removed in the next major version Saving file /package.json Saving file /app.js Saving file /config/db.js Saving file /models/News.js Dev step 15 {"thoughts": "From error messages, it looks like an issue with the database connection. May happen due an unaccessible or inactive MongoDB server or incorrect MONGOURI. Furthermore, there are warnings related to `useNewUrlParser` and `useUnifiedTopology` that have no effect since MongoDB driver version 4.0. First, we need to ensure MongoDB server is running and accessible.", "reasoning": "By checking if MongoDB server is running, and if the URI is correct, we will verify whether the issue exists with the database connection. Also, we can safely remove the warnings by updating the options in the mongoose.connect call as these options are deprecated and have no effect with the updated MongoDB driver version.", "steps": [{"type": "command", "command": {"command": "service mongod status | grep active", "timeout": 3000, "success_message": "active (running)"}, "need_to_see_output": true, "check_if_fixed": false}, {"type": "code_change", "code_change_description": "/config/db.js: Change the 'mongoose.connect' part of the code to `await mongoose.connect(MONGOURI);` This will create a basic connection without the deprecated flags.", "check_if_fixed": false}, {"type": "command", "command": {"command": "node app.js", "timeout": 10000, "success_message": "Connected to the Database :: MongoDB"}, "check_if_fixed": true}]} --------- EXECUTE COMMAND ---------- Can I execute the command: `service mongod status | grep active` with 3000ms timeout? ? If yes, just press ENTER Saving file /package.json Saving file /app.js Saving file /config/db.js Saving file /models/News.js Dev step 16 {"thoughts": "The deprecated options warning itself won't cause the connection to MongoDB to hang. The initial thoughts are that MongoDB is not running as it's supposed to, or the connection string, MONGOURI, is not correct", "reasoning": "To verify the initial thoughts, we should in order first check the mongo service status and then check if MongoDB is lSaving file /package.json Saving file /app.js Saving file /config/db.js Saving file /models/News.js Dev step 17 {"thoughts": "It seems like the MongoDB connection is taking longer than expected. This may be due to a misconfiguration in the Database URL.", "reasoning": "We need to check the MongoDB server status and ensure it's up and running. If the MongoDB server is up then the issue might be in the database connection string or MongoDB deprecation warnings. RemoviSaving file /package.json Saving file /app.js Saving file /config/db.js Saving file /models/News.js Dev step 18 {"thoughts": "It seems that the MongoDB server might not be running or the connection string might be incorrectly specified. Adjusting the connection string and checking if MongoDB service is running should solve the problem.", "reasoning": "In the output logs, we see that the app started but there is no logs on database connection, we need to confirm the Saving file /package.json Saving file /app.js Saving file /config/db.js Saving file /models/News.js Dev step 19 {"thoughts": "The existing MongoDB connection seems to be failing. The timeouts and deprecation warnings suggest an issue with the connection method or the provided MongoDB URI. There also could be network or firewall issue preventing the connection to MongoDB.", "reasoning": "Looking at the initial output and warnings, it seems to be related to the MongoDB URI or the connection settings. Both warnings are related to deprecated configurations so we should adjust the connection configuration to be compatible with MongoDB 4.0+.", "stSaving file /package.json Saving file /app.js Saving file /config/db.js Saving file /models/News.js Dev step 20 {"thoughts": "Looking at the error, it seems that there are deprecation warnings for the `useNewUrlParser` and `useUnifiedTopology` flags. We also don't see the 'Connected to the Database :: MongoDB' message which means MongoDB may not be running or there's an issue with connection settings.", "reasoning": "We need to ensure MongoDB is running and connected to successfully start the application. Additionally, because `useNewUrlParser` and `useUnifiedTopology` options are deprecated, we need to update the MongoDB connection options in our code accordingly.", "steps": [{"type": "command", "command": {"command": "service mongod start", "timeout": 3000, "success_message": "Starting MongoDB"}, "need_to_see_output": true, "check_if_fixed": false}, {"type": "code_change", "code_change_description": "Change the MongoDB connection code in the '/config/db.js' file to be `await mongoose.connect(MONGOURI);`. This will establish a basic connection without the deprecated options.", "check_if_fixed": false}, {"type": "command", "command": {"command": "node app.js", "timeout": 10000, "success_message": "Connected to the Database :: MongoDB"}, "check_if_fixed": true}]} --------- EXECUTE COMMAND ---------- Can I execute the command: `service mongod start` with 3000ms timeout? ? If yes, just press ENTER answer: Saving file /package.json Saving file /app.js Saving file /config/db.js Saving file /models/News.js Dev step 21 {"thoughts": "The node server takes a long time to finish indicating that it is waiting for some resource. As we are trying to connect to mongodb at the startup, it indicates that it might not be able to establish a successful connection to mongodb.", "reasoning": "The deprecated warnings are due to outdated mongoose connection settings. However, it should not affect the connection itself. There might be issues with the MongoDB instance (like it's not running or misconfigured). Hence started MongoDB service and checked the connection.", "steps": [{"type": "command", "command": {"command": "service mongod start", "timeout": 3000, "success_message": "Starting MongoDB"}, "need_to_see_output": true, "check_if_fixed": false}, {"type": "command", "command": {"command": "mongo --eval 'db.runCommand({ connectionStatus: 1 })'", "timeout": 3000, "success_message": "'ok' : 1"}, "need_to_see_output": true, "check_if_fixed": false}, {"type": "code_change", "code_change_description": "In the '/config/db.js' file, Change the 'mongoose.connect' part of the code to `await moSaving file /package.json Saving file /app.js Saving file /package.json Saving file /app.js Saving file /config/db.js Saving file /models/News.js Dev step 23 Saving file /package.json Saving file /app.js Saving file /config/db.js Saving file /models/News.js Dev step 24 {"files": [{"name": "db.js", "path": "/config/db.js", "content": "const mongoose = require('mongoose');\n\nconst MONGOURI = \"mongodb://localhost:27017/github_news_db\";\n\nconst InitiateMongoServer = async () => {\n try {\n await mongoose.connect(MONGOURI);\n console.log(\"Connected to the Database :: MongoDB\");\n } catch (e) {\n console.log(e);\n throw e;\n }\n};\n\nmodule.exports = InitiateMongoServer;"}]} Updated file /srv/workspace/gpt-pilot/workspace/GitHub_News/config/db.js {"type": "command", "command": {"command": "node app.js", "timeout": 10000, "success_message": "Connected to the Database :: MongoDB"}} |
중간에 에러가 발생하면, 자기가 스스로 그 에러를 해결하기 위해서 또 뭔가를 계속 한다.
▶ Quota
계속 이렇게 저렇게 하면서 놀다 보니, 다음과 같은 에러 메시지가 나왔다.
| ... There was a problem with request to openai API: API responded with status code: 429. Response text: { "error": { "message": "You exceeded your current quota, please check your plan and billing details.", "type": "insufficient_quota", "param": null, "code": "insufficient_quota" } } ? Do you want to try make the same request again? If yes, just press ENTER. Otherwise, type 'no'. no Saving file /package.json Saving file /app.js Saving file /config/db.js Saving file /models/News.js ---------- GPT PILOT EXITING WITH ERROR ---------- Traceback (most recent call last): File "/srv/workspace/gpt-pilot/pilot/main.py", line 71, in project.start() File "/srv/workspace/gpt-pilot/pilot/helpers/Project.py", line 138, in start self.developer.start_coding() File "/srv/workspace/gpt-pilot/pilot/helpers/agents/Developer.py", line 52, in start_coding self.implement_task(i, dev_task) File "/srv/workspace/gpt-pilot/pilot/helpers/agents/Developer.py", line 98, in implement_task result = self.execute_task(convo_dev_task, File "/srv/workspace/gpt-pilot/pilot/helpers/agents/Developer.py", line 339, in execute_task result = self.step_command_run(convo, step, i, success_with_cli_response=need_to_see_output) File "/srv/workspace/gpt-pilot/pilot/helpers/agents/Developer.py", line 157, in step_command_run return run_command_until_success(convo, data['command'], File "/srv/workspace/gpt-pilot/pilot/helpers/cli.py", line 480, in run_command_until_success success = convo.agent.debugger.debug(convo, { File "/srv/workspace/gpt-pilot/pilot/helpers/Debugger.py", line 63, in debug result = self.agent.project.developer.execute_task( File "/srv/workspace/gpt-pilot/pilot/helpers/agents/Developer.py", line 344, in execute_task result = self.step_code_change(convo, step, i, test_after_code_changes) File "/srv/workspace/gpt-pilot/pilot/helpers/agents/Developer.py", line 130, in step_code_change return self.test_code_changes(code_monkey, updated_convo) File "/srv/workspace/gpt-pilot/pilot/helpers/agents/Developer.py", line 551, in test_code_changes llm_response = convo.send_message('development/task/step_check.prompt', {}, GET_TEST_TYPE) File "/srv/workspace/gpt-pilot/pilot/helpers/AgentConvo.py", line 99, in send_message raise Exception("OpenAI API error happened.") Exception: OpenAI API error happened. -------------------------------------------------- ? We would appreciate if you let us store your initial app prompt. If you are OK with that, please just press ENTER |
이런 !!! 돈이다 !!!
- https://platform.openai.com/usage
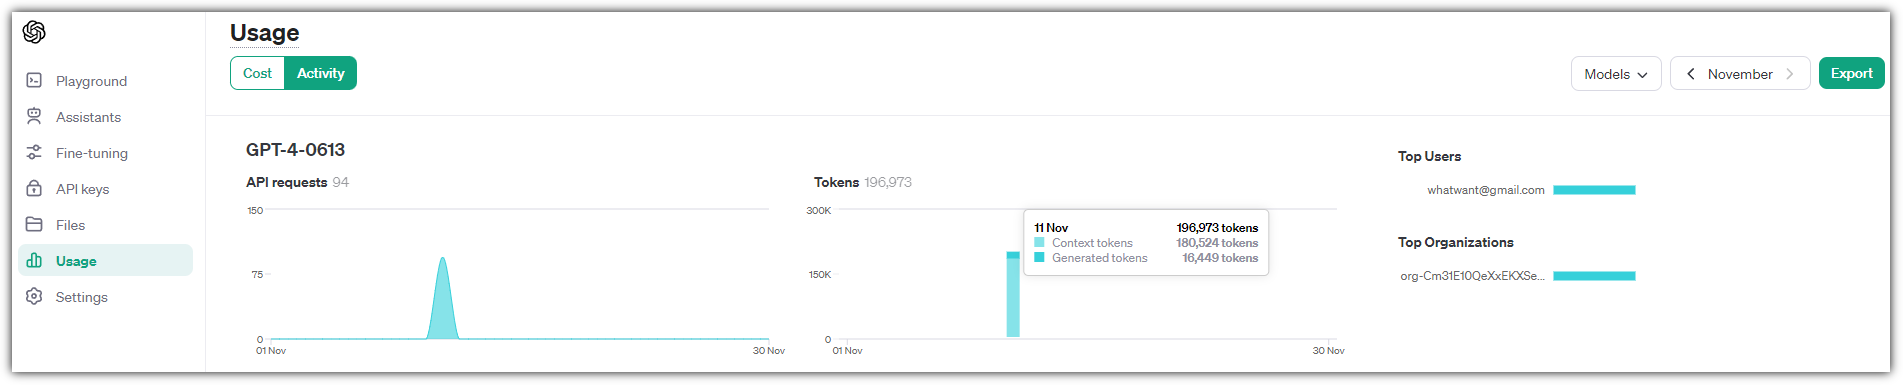
API는 돈이다 !!! ㅠㅠ
중간에 쓸데 없이 이것 저것 하다보니..... 돈이다 !!!!
음... 완제품까지 달려보지는 못했지만, 적당히 잘 가지고 놀아본 것 같다.
Copilot Chat 또는 ChatGPT를 이용해서 대화 형식으로 코딩을 해볼 수는 있지만,
그 느낌과는 확실히 다르다는 것은 알 수 있었다.
AutoGPT와 같은 느낌이었는데, 그것보다는 조금 더 고급스러운(진화한) 느낌이다.
다만, 필요한 패키지들을 설치한다던지 MongoDB 같은 것을 설치한다던지 해주는 것은 좋았지만
버전간의 호환성이나 deprecated 된 함수들을 사용한다거나 하는 등의 문제는 좀 있는 것 같다.
자기 스스로 그런 에러들을 해결하는 방법을 찾아서 해결해나가는 과정이 있기는 하지만
그러기 위해서 API call을 남발하는 모습을 보면 !!! ㅠㅠ
그런데, 한 step 씩 뭔가 만들어 나가는 과정을 지켜보면 AI Developer가 멀지 않은 것 같다.
다행인 것은 아직은 AI Assistant 수준을 벗어나지 못한 것 같다는.... ^^
아~ 내 돈 !!!!
'AI_ML' 카테고리의 다른 글
| MCP (Model Context Protocol) Overview (0) | 2025.04.14 |
|---|---|
| 주피터 노트북의 여러 도우미 (Jupyter Notebook's Helper) (1) | 2024.02.12 |
| Kubeflow 설치 (in Kubernetes) (0) | 2023.08.23 |
| 건방진 GPT를 아시나요? - BratGPT (0) | 2023.07.16 |
| PDF 문서(논문)에 대해서 알려줘 - ChatPDF (0) | 2023.05.28 |